http://www.mindbodygreen.com/0-15172/
a-simple-yoga-sequence-to-open-your-hips-
if-you-sit-too-much.html
a-simple-yoga-sequence-to-open-your-hips-
if-you-sit-too-much.html
A Simple Yoga Sequence To
Open Your Hips If You Sit Too Much
Open Your Hips If You Sit Too Much
Our hip flexors can become really tight and shortened from sitting too much,
which can lead to lower back issues.
which can lead to lower back issues.
So it's important for not just our sedentary society to stretch their hip flexors daily,
but also for runners, walkers
and cyclists. We can all benefit from stretching out our hip flexors, whether it's to
open up tight areas from
sitting too much, or to help counterbalance prolonged or strenuous hip flexion
from a more active lifestyle.
but also for runners, walkers
and cyclists. We can all benefit from stretching out our hip flexors, whether it's to
open up tight areas from
sitting too much, or to help counterbalance prolonged or strenuous hip flexion
from a more active lifestyle.
Yoga is great for stretching these areas. There are many asanas you can ease yourself into,
to allow for a
gentle opening of the hips. Here is a simple six-pose sequence that you can hold fo
r five slow breaths,
and allow your body to soften for optimal hip flexor relief. Be sure not to force yourself
into any of these
poses, but move with patience and intuition based on what is best for your body. Alway
s be sure to
complete both sides of the body in each pose!
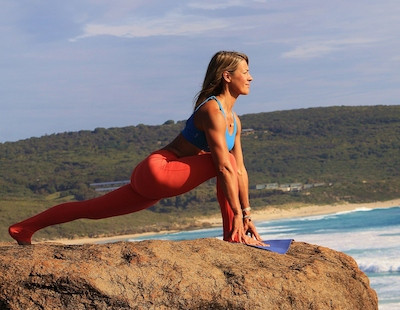
Low lunge is ideal for those who find balancing difficult. This stretch focuses on the hips, groin
and quadriceps.
and quadriceps.
From standing, exhale and step your left foot back and lower it to the floor with your hands framing
your front foot. You can bring your hands to blocks or to the floor, just be sure to keep your right
foot between your hands, and directly below your knee. Inhale and lift your chest to reach up and
forward, pressing the shoulder blades in against the back. Keeping your hips square, draw the tailbone
down and gently pull your belly in toward your spine.
Hold here or for a deeper stretch, inhale and reach the arms over the head with your palms facing in.
Be mindful to lift out of the pelvis so you don't jam the lower back.
Be mindful to lift out of the pelvis so you don't jam the lower back.
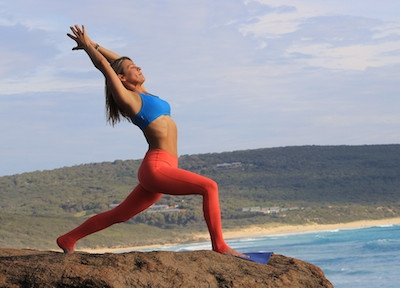
Crescent lunge opens the front of the body, extends the spine and builds leg strength and balance.
The psoas muscle of the main hip flexor is targeted, as the thigh bone moves away from the lower
back. The nervous system is awakened and the heart is opened.
The psoas muscle of the main hip flexor is targeted, as the thigh bone moves away from the lower
back. The nervous system is awakened and the heart is opened.
From Low Lunge, tuck the back toes and exhale as you lift the back knee off the floor and stand
up into the pose. Feet are hip width apart and both toes face forward. Start with your hands on
your hips and bend the front knee to 90 degrees, with your knee over the ankle and hips pointing
straight ahead. Keep the back leg bent if the hamstrings are tight, and only straighten if you
can keep the pelvis square to the front of your mat. Draw the left hip forward and right hip back
to keep the hips square, and tuck your tailbone to keep the pelvis from tipping forward.
For more extension, inhale and raise the arms, hands apart and palms facing in, and soften the shoulders.
3. Warrior I (Virabradhasana I)
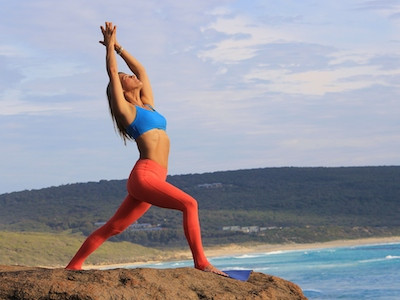 In Warrior I, the turned-out toes of the back foot
 increases hip flexion. If you press into the outer
edge of your back foot, you will notice the hips
square off more easily. This pose builds strength
and steadiness, as it increases body awareness,
improves circulation and energizes the entire body.
From Crescent Lunge, drop the back foot to 45
degrees and soften the shoulders away from the
ears. Inhale and reach the arms above the head and soften the shoulders away from the ears.
Exhale to soften into the front bent knee, keeping it at 90 degrees.
degrees and soften the shoulders away from the
ears. Inhale and reach the arms above the head and soften the shoulders away from the ears.
Exhale to soften into the front bent knee, keeping it at 90 degrees.
For a deeper stretch try reaching the right hand toward the floor and feel the hip flexor get a bit more love!
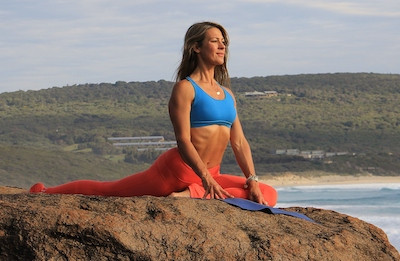
4. One-Legged King Pigeon Pose (Eka Pada Rajakapotanasana)
Pigeon pose releases tension from deep in the outer hip joint, and many people
feel this stretch releases emotional tension as well. With the forehead resting in a forward fold, the nervous system is also relaxed.
feel this stretch releases emotional tension as well. With the forehead resting in a forward fold, the nervous system is also relaxed.
From Warrior I, release your hands to the ground and fold the front leg to the
floor, tucking the heel in
floor, tucking the heel in
close to the left groin and you slide your left leg back behind you. The front shin
should rest on your mat at about 45 degrees, but you might be able to rest it in
parallel to the top line of your mat. Keep the front foot flexed to protect the knee
and make sure the back of the left foot behind you is flat on the ground. Square off your hips.
should rest on your mat at about 45 degrees, but you might be able to rest it in
parallel to the top line of your mat. Keep the front foot flexed to protect the knee
and make sure the back of the left foot behind you is flat on the ground. Square off your hips.
Stay here, or walk the hands forward and lower the torso to the ground, and rest
the forehead on the hands, block or mat for at least five breaths.
the forehead on the hands, block or mat for at least five breaths.
To take this pose deeper, walk the hands back in by your sides and inhale to reach
them above your head. Keep reaching up out of the pelvis to protect the lower back.
Hold for another five breaths and return your hands to the floor.
them above your head. Keep reaching up out of the pelvis to protect the lower back.
Hold for another five breaths and return your hands to the floor.
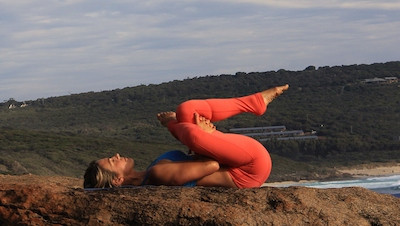
5. Supine Pigeon (Supta Kapotasana)
If tight knees and hips mean Pigeon pose isn’t for you, try it lying down. This pose is a great
preventative knee stretch as it will lengthen the iliotibilial band (ITB) that runs from the
pelvis (on the outside of the leg) to the shin bone.
preventative knee stretch as it will lengthen the iliotibilial band (ITB) that runs from the
pelvis (on the outside of the leg) to the shin bone.
Begin with the soles of your feet on the floor and lift the left ankle and rest it on top of the
right knee, keeping the left foot flexed. Bring the knees closer towards the chest, and thread
your left arm between the legs and the other hand around, to join them together behind the
right thigh.
right knee, keeping the left foot flexed. Bring the knees closer towards the chest, and thread
your left arm between the legs and the other hand around, to join them together behind the
right thigh.
Keeping the hips low to the ground, draw in the clasped thigh closer to the chest and open the
opposite knee wider. Soften your shoulders into the mat.
opposite knee wider. Soften your shoulders into the mat.
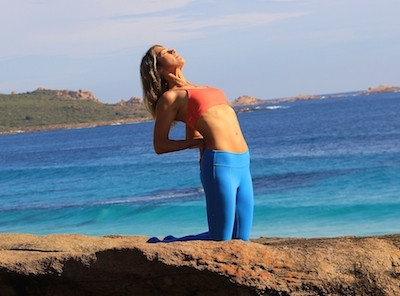
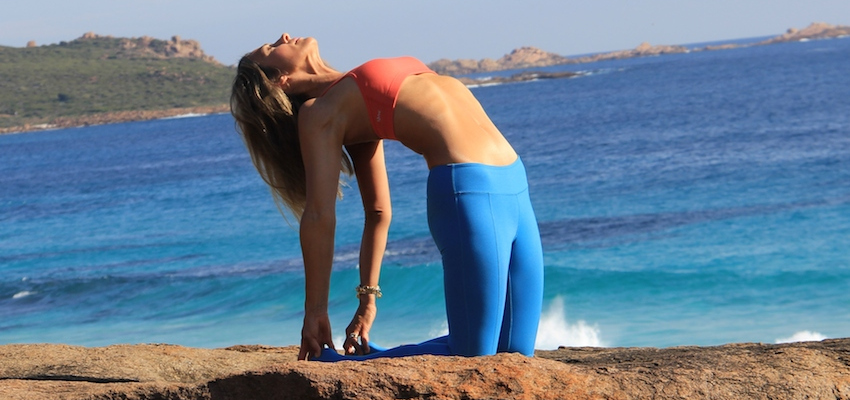
6. Camel Pose (Ustrasana)
An invigorating stretch that will open the entire front of the body and stretch the
front of the hip flexors.
front of the hip flexors.
Kneel with your legs shoulder width apart, with the feet untucked and palms
placed on the lower back, fingers facing down. Inhale to lift and open the chest,
exhale to lower back towards your heels, keeping the gaze upwards. Be sure
not to just throw your head back. Use the fingers in the back to encourage
tucking the tailbone and prevent jamming in the lower back.
placed on the lower back, fingers facing down. Inhale to lift and open the chest,
exhale to lower back towards your heels, keeping the gaze upwards. Be sure
not to just throw your head back. Use the fingers in the back to encourage
tucking the tailbone and prevent jamming in the lower back.
Hold the pose here, or for more extension, release one hand at a time to lightly
grip the tops of the heels. Inhale to lift up and out of the pose by pressing
on your lower back.
grip the tops of the heels. Inhale to lift up and out of the pose by pressing
on your lower back.
Photo Credit: Courtesy of the Author
No comments:
Post a Comment